Tuesday, December 27, 2011

Photo Collage/Posters

I am a student, and I live in a dorm room (erh... excuse me, 'residence hall'...) and I try my hardest to make it cute and fun. My walls are covered with things that my friends and I have painted and made over the years. I recently realized that I had no actually pictures hanging in my room, absolutely NONE. No family, no friends. I decided this needed changed. I looked into making a photo canvas (where you transfer a black and white photo to a canvas, which I still plan on doing btw) but I wanted to do 20+ pictures. So then I decided I was going to make a collage of pictures and then print it as one unit onto my canvas. I quickly realized that was putting too much time into such a silly project so I opted for a MUCH easier solution. Instead, I bought two black foam boards and printed 35 black and white photographs of all of my family and friends over the past few years. My expectations for this project were very low, and  I was actually quite impressed with the way they turned out. All I did was lay my pictures out and glue them on using a matte mod podge. Then, this is what really made them look cool, I coated the entire board in the matte mod podge. This took the shiny-ness away from the pictures, and turned it into one uniform looking poster. Here are the results:


(I apologize for the bad quality, they looked fine on my computer but when I uploaded them something strange happened...)

This project was overall really simple, inexpensive, and fun. I can't wait to hang them up when I go back to school! Now only if I could find enough empty wall space... :) 

Newsprint Nails!


Hello Again! Here's the story with this post, I newsprint my nails all of the time! Of course, the time I do it and actually remember to take pictures so I can write a post about it, they turn out pretty shitty. Oh well! Because of this I have posted my pictures, but the following picture is the result of a google image search, this is what they have looked like all of the OTHER times I have done it:  


Anyways, the reason they didn't turn out as good was because I was doing this while laying in my bed watching csi on my computer. I know, not the ideal place to be painting your nails, right? 
Supplies:
neutral nail polish color
good, clear topcoat
newspaper
rubbing alcohol, or vodka
a small bowl

Step one is to paint two good coats of the neutral base color. I normally use "coney island cotton candy" by OPI. The most important part here is to have PATIENCE. You have to let the second coat dry completely before moving on to the next step. 


 Step two: Pour some of the rubbing alcohol, or vodka (but why waste the real stuff??) into your bowl. I usually put just enough so that it is about 1 cm deep. Next, dip your finger, nail side down, into the bowl of alcohol. Pull out your finger and IMMEDIATELY stick a piece of newspaper to it. Rub all over the newspaper. Peel the newspaper off. Repeat for all 10 fingers. In the past I have cut 10 strips of newspaper, but now I just stick my finger onto random sections of one page, although precutting the strips is easier! When finished top with a good coat of your topcoat, let dry, and tada! Newsprint Nails!

Here are a few pictures from my most recent attempt:


My advice to you is to do it more than once, it probably won't come out great the first time you try it! Mix it up a bit, try different size and style fonts on your nails, I even tried pictures once! Happy crafting!

Wednesday, December 21, 2011

Used Book, Turned Cool New Clock!

Hey Guys!! Sorry for the excruciatingly long absence, I have realized that work and school and blog don't work very well together...However, I am on winter break now and I have a ton of catching up to do! Anyways, I  have always had a love for books, and am an avid reader. So, this is a tutorial and how to turn a book into a clock. I know some of you might be angry at me for turning a book into a clock, but I think it is a great idea! These are all books that I got from THE BOOKSELLER, in Akron, Ohio. They can be found online at <http://www.thebooksellerinc.com/>. This is the second project that I have done with books (the first was a book-lamp, tutorial coming soon) and I think that turning the books into pieces of art is a great idea, they will always be appreciated!


 Okay now, on to the tutorial. This was actually a lot simpler than I thought it was going to be, the hardest time I had was actually getting the clock mechanism to work, but that story will come later. 

The supplies needed for this project are actually really easy to get a hold of. you will need:
-an old book (I got mine for a dollar at The Bookseller)
-a clock mechanism (can be found at most any craft store)
-an AA battery
-clock numbers (if desired)
-an exacto knife (or 2)

The first (and most time consuming and frustrating step) is to take measure where you wand the center of the clock to be and poke a small hole through the book cover. After you have poke a small hole make a mark on the inside cover. Open the front cover of the book and trace the size of your mechanism, with the center of the mechanism matching the do you drew earlier. Now comes the frustrating part, use the exacto knife to cut a square out of the book the size of your mechanism. HINT: be careful that you are cutting on a straight line, not a diagonal. If the book cover opens too far it will pull the pages at a slant and your square will be more of a tetrahedral shape. After all is said and done it will look like this:


Now, I forgot to take a picture of the next part, but it is simple to explain. I took an extra page from the book and glued it over the top page of the book so it was covering the hole. after the glue dried I cut the page diagonally, making an x. I then folded down the sides of the x and glued them to the inside of the hole. This step is necessary, but it makes the project much neater, and makes it easier to get the clock mechanism in and out of the book. Next you are going to place your mechanism into the hol in the book and make sure it fits. It might need a little adjusting.


 Next, make sure the center of your clock matches the hole you made in the cover. If it doesn't, do not fear, it can be fixed! if the hole doesn't match up, you have two options. First, make the hole in the book bigger so the mechanism so can be adjusted. Second, when you make the hole in the cover over, move it to where you want. I would suggest the first option if your centers are way off, not even touching, and the second option if they are just off a little. After you have them matched up you have to widen the hole in the cover. I opted for the easy method and just pushed a sharpie through the cover :)


At this point you may want to consider cleaning up the hole in the cover, I trimmed back the extra stuff around the hole so the clock hands would sit straight. When I was done cleaning it up i slabbed some tacky glue on it to keep everything smooth. The next step is where it gets a little tricky. All you have to do is follow the directions on the back of your clock. However, make sure that everything is really tight before you put the hands on, they are easily bent and kind of difficult to get off! The picture on the left is a picture of the clock I used. The specific sizing is on the right of the label, they come in all different sizes so make sure you get the right one for your book! The picture on the right is the top of the clock coming through the cover of the book and the nuts are tightened to keep everything together.


Next, keep following the directions on the back of your clock and put the hands on. This is where I had the most trouble, I originally bought a different clock. I installed it, but it didn't keep the time correctly. The hands would stick together and the hour hand would move 4 or 5 hours in just 60 minutes. I am no sure what happened, but I bought a new one and it worked much better! This is a picture of the clock without the number. (I didn't know if I wanted them or not...)


 But I eventually decided I wanted to put the numbers on, and I really like how it turned out! I think the numbers really made a difference! I also considered painting numbers on, but I opted out because I really liked the way the gold numbers matched!


Finally, here is the finished book clock sitting on my book shelf. I love it! 


Hopefully more updates coming soon, but until then, Happy Holidays!

Saturday, October 15, 2011

Spaghetti Squash and Some Homemade Sauce

           Alright guys here we go again!! Sorry for the long absence, I had midterms :/ Something else that I am going to be doing on here is documenting my search for good college food. You see, I LOVE cooking, and I miss cooking when I am at school. My solution for this? Find recipes I can make using just my microwave. I have tried 4 different recipes, 2 of which were good.
            This first entry is my attempt at making spaghetti squash. Why is it called spaghetti squash you ask? well, It is a squash that when cooked shreds and looks like spaghetti strands. It is a very yummy thing that I was introduced to about three years ago. I never actually planned on attempting to make this in my dorm. Until my mom sent me back to school with one.
           Okay, first things first. You will need a spaghetti squash, sauce, butter (if desired), cheese (if desired), a fork, sharp knife, microwave safe plate, and a paper towel. Please note that my cooking times are for a 700 watt microwave.

 The hardest part of the entire process is cutting the squash in half. I didn't have a sharp knife in my room so it took me a few tries.

 Wet a paper towel and cover the spaghetti squash. Cook on high for 5 minutes. Remove from microwave.
 Take your fork and start to "shred" the squash. Do this by scraping the fork along the edges of the squash. At this point I added a little bit of butter. Recover the squash and microwave for a minute. Remove again. finish shredding the squash.
 At this point I dumped the squash into my microwave safe bowl and added the pasta sauce. At this point I would usually add some shredded cheese. However, my mom was awesome and sent me back to school with a little mason jar of homemade sauce, so I thought the cheese wasn't necessary (her sauce is so good I could just eat it with a spoon). After the sauce/cheese is on microwave another 45 seconds. Enjoy!


Adorable Tutu, Made from Scraps!!--Update!

I originally saw this idea when I googled tutus for my cousins 2nd birthday. My plan was to learn how to make a cute little pink tutu. then I saw a picture of a "scrap tutu".


 I think that this is an awesome idea, especially since I have TONs of scrap fabric. Sadly, there was no tutorial, but it looked fairly simple so I decided to attempt it. Fairly simple is an understatement. This is, hands down, the easiest thing I have ever sewn. 

Materials:
-pile of scrap fabric
-scissors
-3/4" elastic
-iron
-black thread
-sewing machine
-measuring tape


Cut your scrap fabric into strips. Mine were about 2" thick and ranged from 18"-22" long. 

  Iron the strips and fold them in half lengthwise. (I used approximately 40 strips.)

 Each strips needs to have a casing thick enough to slide your elastic through. I used 3/4" elastic so my casing was an inch thick.
  Cut the bottom of each strip at an angle.
 At this point I kind of failed at taking pictures. However, it is really simple. All you have to do is begin threading the elastic through the strips. I used 20" of elastic and found that it was a little too big for my cousin so I cut out about 3".  I found that once I got about 12 on they started falling off the other end. To remedy this problem I folded the elastic over and stuck a pin in it. Like this:
 Put on as many strips as possible, the closer they are bunched together the thicker the skirt will be. Once squeezed as close as possible remove the pin and overlap the elastic. Use your sewing machine on a zig-zag stitch. Stitch like crazy. I went a little overboard and covered the entire overlapped section...oops.
 The finished product:
 One of the best things about this project is that almost every type of fabric would work. Mine were mostly cotton, muslim, and canvas. Of course when my sister saw it she thought it would be a great idea to try it on. i told her no. She insisted. I insisted. As you can see, I lost the argument.
Abby's birthday is in a few weeks so I will make sure I will upload a picture of Abby in her new tutu!!

I know these pictures are a little over due, but they are finally here. These pictures are my cousin, Abby, wearing her new tutu!! The picture quality isn't great, but they are adorable!


Sunday, September 25, 2011

Newspaper Paintings

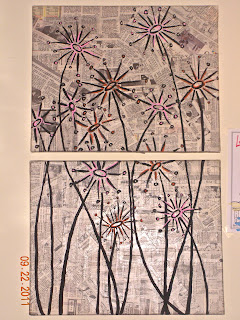
Okay guys here we go!! My first tutorial, newspaper covered canvas. I came up with this idea over the summer. I have always wanted to paint two canvases that made up one picture. Here was the result:
I didn't think this project would turn out very well, since I really had no idea what I was doing. However, I was pleasantly surprised by the outcome!

Supplies:
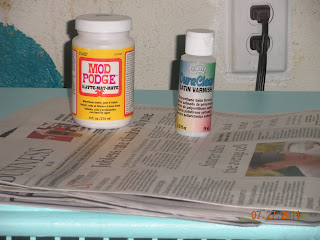
-Mod Podge (I used almost an entire jar)
-Canvas (mine were 16x24, but any size would work)
-Newspaper
-needle (if necessary)
-Finishing Paint (I used DuraClear Satin Varnish)
-paints & brushes

          So I kind of failed at taking pictures during the project, but the process was fairly easy. First you cut the newspaper into strips (the size doesn't matter. I cut mine into strips that were about 2 inches thick, and the length of the newspaper) I found that puzzles, images etc were more interesting than just the newsprint. Next, cover a section of the canvas in mod podge, starting at the edge and working your way in. Pull the strips tight across the canvas and smooth down with your hand. Leave extra newspaper hanging off the edge of the canvas (about 2 inches extra. Cover the canvas completely. I found the more the newspapers criss-crossed the more interesting the canvas became.
         Once dry, begin finishing the edges of the canvas. Start at one corner and work the entire way around the canvas. Make sure to pull the newspaper tight. Once the edges are dry trim off the extra newspaper. 


            At this point the entire canvas should be covered in newspaper and the mod podge should be dry. There may be small air holes under the newspaper, this is where the pin comes in handy. Take the pin and pop the bubble, smooth the newspaper out and cover in a layer of mod podge. 
           Once that has dried I covered the entire canvas in a coat of the DuraClear finish. Once dried you can paint on it, or just leave them alone. Hang in your room, apartment, or house and enjoy!! Here is my finished project again: 

Wednesday, September 21, 2011

Just Trying to Figure Things Out

Hey Guys! I am posting this to warn you that I am still trying to figure out this whole blogging thing, so it might take a few days to get my first real entry posted. Also, my posting will be sporadic throughout the school year. I am a sophomore in college so my class schedule tends to get a little crazy. However, I will try to update as much as possible!

Saturday, September 17, 2011

First Ever Blog Entry!!

I have finally gotten my blog under way! Over the past few years I have gotten into several very complicated projects in which a tutorial via blog would have been helpful.  Although I doubt many people will ever actually read this, my goal is to provide detail tutorials to many of my craft projects. I will also have entries about my adventures in cooking, sewing, nail painting, and anything else that seems interesting :)